
Understanding Vapor Barrier Installation
What is Vapor Barrier Installation?
Vapor barrier installation involves placing a barrier in a building, typically within the crawl space, to prevent moisture from penetrating the living areas above. This is crucial in maintaining indoor air quality and structural integrity. The materials used can vary, but they generally consist of thick plastic sheets designed to block moisture effectively. Understanding this process is essential for homeowners who want to preserve their property’s value and ensure a healthy living environment.
Why is Vapor Barrier Installation Important?
Vapor barrier installation is vital for several reasons. Firstly, it helps prevent moisture buildup, which can lead to mold growth, wood rot, and ultimately, structural damage. Secondly, it enhances energy efficiency by preventing heat loss through moist air exchange. Lastly, proper installation can significantly improve indoor air quality by reducing allergens and irritants that thrive in damp conditions. For homeowners looking to protect their investment, understanding the importance of Vapor Barrier Installation is key.
Common Materials Used in Vapor Barrier Installation
The success of vapor barrier installation largely depends on the materials used. Common options include polyethylene sheeting, which is the most popular due to its durability and moisture resistance. Some homeowners may opt for reinforced vapor barriers that provide extra strength, while others might choose foil-faced options that reflect heat and improve energy efficiency. Researching the right material based on specific conditions and climate can greatly enhance the effectiveness of the barrier.
Preparation for Vapor Barrier Installation
Assessing Crawl Space Conditions
Before diving into installation, it’s crucial to assess the crawl space conditions. Look for signs of moisture intrusion, such as dampness, mold, or standing water. While inspecting, consider the source of moisture, which may include poor drainage, plumbing leaks, or outdoor humidity. This initial assessment will guide you in determining the necessary steps for your vapor barrier installation and help in selecting the right materials.
Essential Tools for Vapor Barrier Installation
Having the right tools on hand can make the vapor barrier installation process smoother and more efficient. Key tools include:
– Utility knife or scissors for cutting the barrier material.
– Measuring tape for accurate sizing.
– A heavy-duty stapler to secure the barrier.
– Duct tape or sealing tape to bond seams and edges.
– Gloves and a mask for personal protection during installation.
Equipping yourself with these tools will ensure you’re prepared for a successful project.
Measuring and Planning Your Vapor Barrier Installation
Proper measurement and planning are critical components of a successful vapor barrier installation. Start by measuring the crawl space dimensions to determine how much material you’ll need. Plan for overlaps of at least 12 inches at seams to ensure full coverage and moisture protection. Additionally, consider the placement of vents, pipes, and other structures that may need to be accommodated during installation.
Step-by-Step Guide to Vapor Barrier Installation
Cleaning and Preparing the Surface
The first step in the actual installation process is to thoroughly clean the area where the vapor barrier will be laid. Remove any debris, old insulation, or moisture-laden items. This not only ensures a clean surface for laying the barrier but helps identify any existing issues that may need addressing before installation.
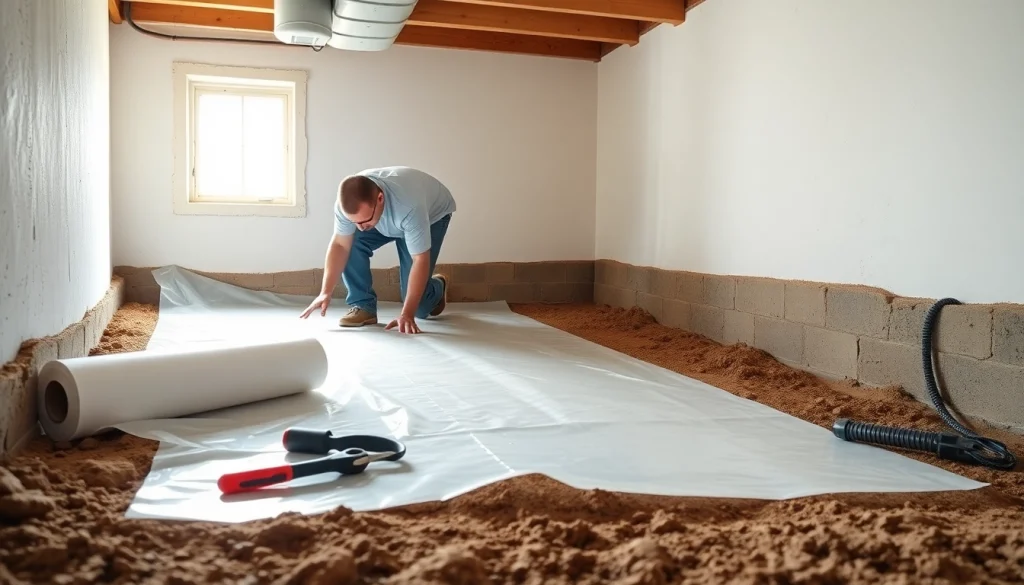
How to Properly Lay the Vapor Barrier
Once the surface is prepared, begin laying the vapor barrier. Start at one end of the crawl space and unroll the barrier across the ground, making sure to extend it up the walls slightly. Cut the barrier to size as necessary and ensure there are no holes or tears. Use a heavy-duty stapler or adhesive to secure the barrier to the walls and the ground. Creating a seamless barrier is essential for preventing moisture penetration.
Sealing and Insulating After Vapor Barrier Installation
After laying the vapor barrier, sealing all seams is crucial for maximizing effectiveness. Use duct tape or sealing tape to secure edges and overlaps. If the space allows, adding insulation over the barrier will help improve energy efficiency and provide additional moisture protection. Check all sealed areas regularly for integrity as part of ongoing maintenance.
Challenges and Solutions in Vapor Barrier Installation
Common Mistakes to Avoid in Vapor Barrier Installation
Avoiding common mistakes can save time and resources. One frequent error is neglecting to overlap seams sufficiently, which can allow moisture to seep through. Another mistake is failing to account for pipe entries, which can lead to gaps. Always double-check measurements and ensure seals are tight for maximum protection.
Dealing with Moisture Issues During Installation
If moisture issues arise during the installation process, consider using a dehumidifier in the area prior to beginning work. This can help reduce moisture levels, making it easier to install the vapor barrier correctly. Additionally, it may be necessary to address leaks or drainage issues before proceeding with the installation to ensure long-term effectiveness.
Maintaining Your Vapor Barrier After Installation
Once the vapor barrier is installed, regular maintenance is critical to ensure its effectiveness. Schedule annual inspections to check for damage or wear. Look for signs of moisture intrusion, mold growth, or pests. Rectify any issues immediately to avoid larger problems in the future. Maintaining the barrier is essential for preserving a healthy crawl space.
Benefits and Effectiveness of Vapor Barrier Installation
Energy Efficiency Gains from Vapor Barrier Installation
One of the notable benefits of vapor barrier installation is the enhancement of energy efficiency. By preventing moisture-induced heat loss, barriers can lead to lower energy bills and improved home comfort. Studies show that proper installation can reduce energy costs by up to 20%, making it a smart investment for homeowners.
Health Benefits of Proper Vapor Barrier Installation
Healthwise, a well-installed vapor barrier can significantly contribute to an improved indoor air environment. By reducing molds, allergens, and other irritants that thrive in damp spaces, homeowners can enjoy cleaner air. This is particularly beneficial for individuals with respiratory conditions or allergies, providing peace of mind regarding air quality.
Long-term Value of Investing in Vapor Barrier Installation
Investing in vapor barrier installation can yield significant long-term benefits. Beyond immediate moisture protection, a proper barrier can extend the lifespan of a home’s foundation and interior. Preserving the integrity of structural components saves costly repairs over time, making the initial investment well worth it.
Frequently Asked Questions
1. How long does a vapor barrier last?
Typically, a properly installed vapor barrier can last anywhere from 10 to 20 years. Regular maintenance and inspections can prolong its effectiveness.
2. Can I install a vapor barrier myself?
Yes, many homeowners can install a vapor barrier themselves with the right tools and guidelines. However, professional assistance may be beneficial for complex situations.
3. What thickness should a vapor barrier be?
A thickness of at least 6 mil (0.006 inches) is recommended for most residential applications to effectively block moisture.
4. Do I need a vapor barrier if I have a concrete floor?
Even with a concrete floor, installing a vapor barrier is advisable, as concrete can retain moisture, which may lead to issues over time.
5. How do I know if my vapor barrier is effective?
Regularly inspect the area for signs of moisture, mold, or pest activity. A lack of these indicators typically suggests that the vapor barrier is functioning properly.